
When blogging was young it was mostly about the words but now images are a major part of almost every blog I see today. I consider photos to be very important on this blog, partly because they help to tell the story. With that in mind, I want to share some of the things have learned over the years.
Photography is all about collecting light and there are three major components that help you do that. Each one has its own advantages and disadvantages. I’m talking about shutter speed, aperture, and ISO. Each of these can be adjusted to help get the right amount of light for a good exposure but knowing which ones to adjust is a challenge because there are so many factors to consider. Let’s start with aperture.
Aperture
Aperture is simply the size of the opening in the lens. This is also referred to as an f-stop. I believe the “f” is for “factor” and it is a ratio of the focal length of the lens to the diameter of the opening, or pupil. For example, on a 50mm lens f-11 would be 50/11 or 4.5mm. An aperture setting of f-1.4 would be 50/1.4 or 35.7mm. The important thing to remember is that the smaller the number the larger the opening.
The size of the opening matters because whenever you double the size of the aperture you cut in half the time it needs to stay open for a proper exposure. Some lenses are considered “fast.” These are very expensive but have apertures as wide as f-1.0. Some are even wider than that. These are good for very low light conditions or when the shutter speed needs to be very fast.
Of course, for every plus in photography, there is a minus. The larger the aperture, the smaller the area that will be in focus. To understand why let’s look at a pinhole camera.
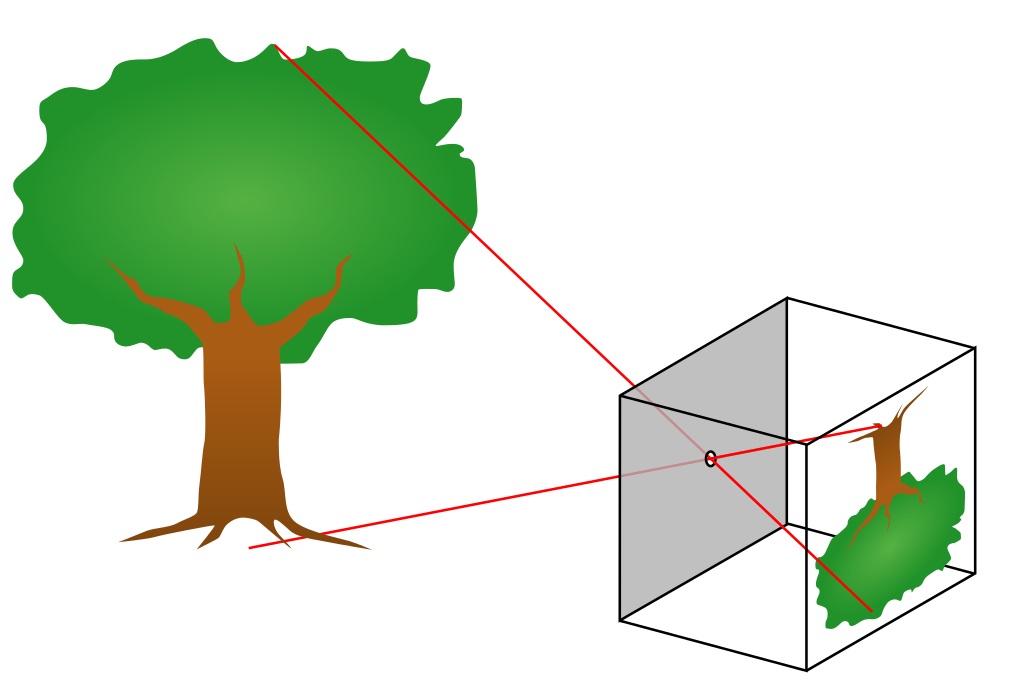
Source Wikipedia
This is the most basic type of camera where a pinhole is made on one side of the box and photographic paper placed against the other side. To get a perfectly sharp image, the pinhole would have to be no wider than a single ray of light, but that would let in so little light that the exposure time would be extremely long. A larger opening would shorten the exposure time but then the light coming from the top of the tree, for example, would enter the opening through the top of the hole, the bottom, left, right, middle, etc. The light would then strike the film at slightly different spots causing the image to be out of focus.
The camera lenses solve that problem to some degree but they create instead a focus zone. That essentially means that one area of your photo, your subject hopefully, is in perfect focus and a certain area in front and behind is in acceptable focus. The rule of thumb is one third in front and two thirds behind. This zone of focus is also called depth of field. The important thing to know is that the smaller the aperture, the larger the depth of field.
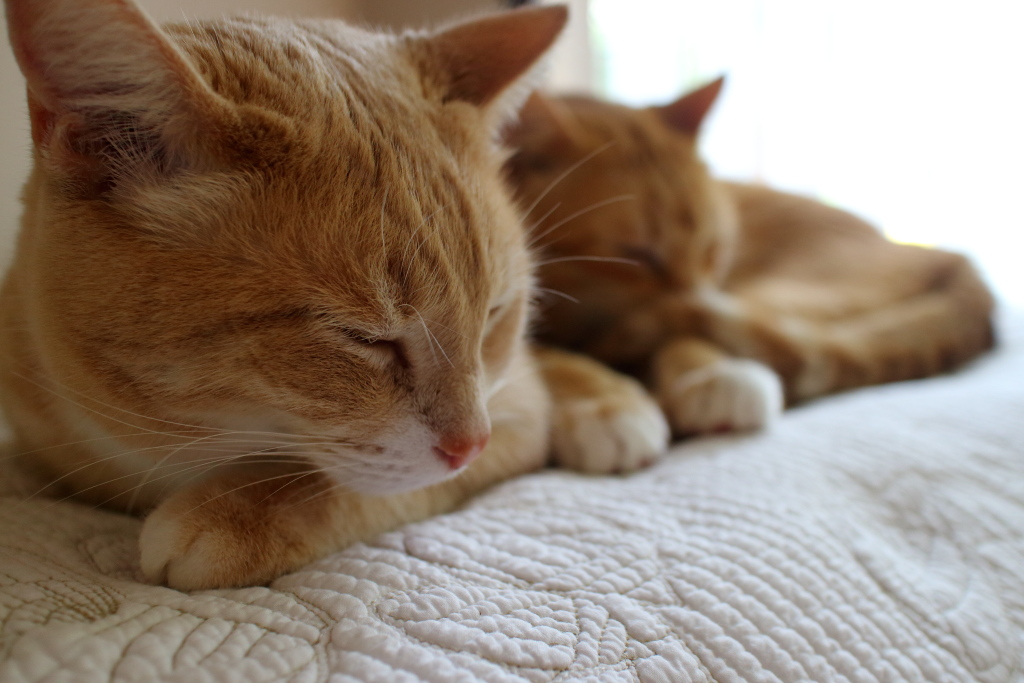
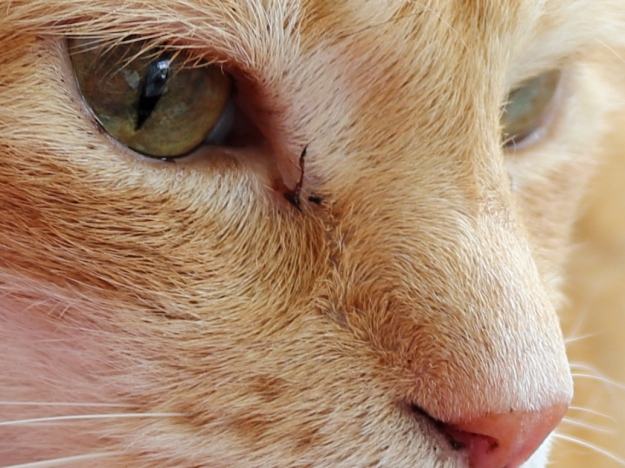
Below is an example of a photo with a small depth of field. This is Frankie and Chris taken using an f-2.2 aperture. Notice how Chris is close to Frankie but still out of focus. Sometimes this is desirable. I think this photo works well with just Frankie in focus.
I took the photo of Floki and Chris below using a smaller aperture of f-7.1. Notice how much more is in focus. Even the car in the background is relatively sharp.
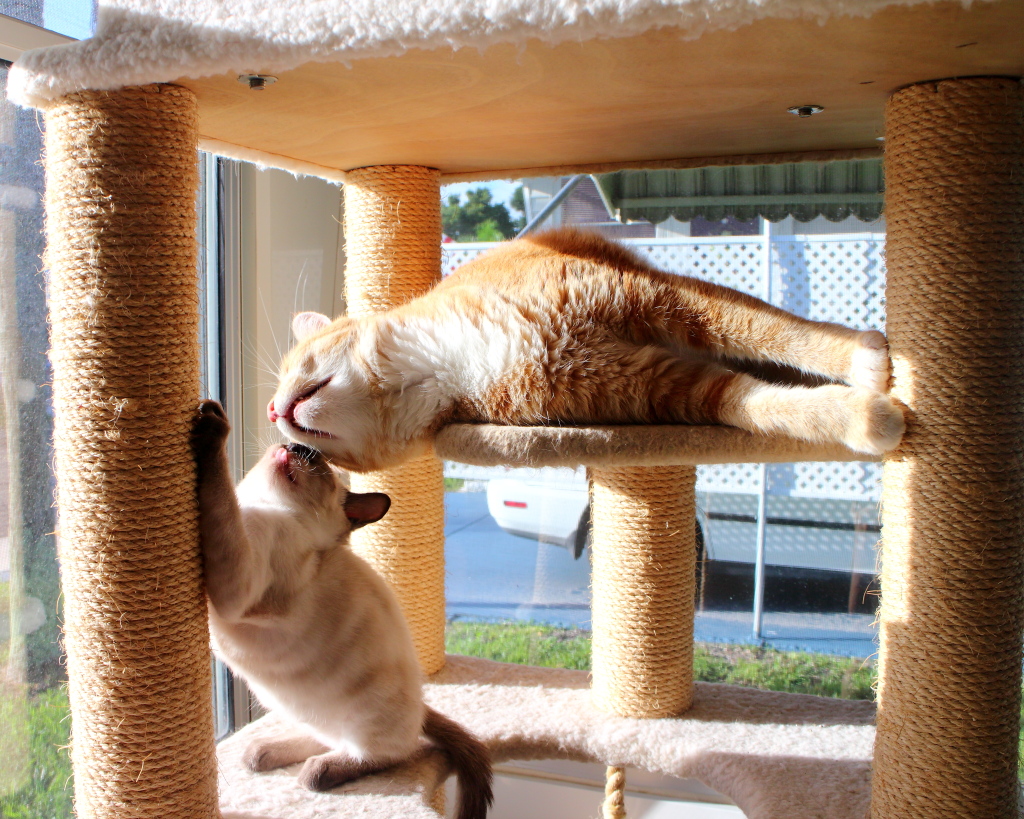
A larger aperture would have made the photo better by blurring out unimportant parts. To get that larger aperture I would have also had to increase the shutter speed which, in this case, would not have hurt the photo. I will talk about that in the next two sections.
Shutter Speed
A shutter is basically a light-proof “curtain” between the lens and the sensor. It slides open to allow light to reach the sensor and then closes after a given amount of time. That time is called the shutter speed and can range from several seconds to 1/4000th of a second. The shutter speed serves two basic purposes. It varies the amount of light reaching the sensor and it can blur or make sharp a moving object.
This is kind of important to know for pet photographers because it is difficult to keep them still while you try to take their photo. Granted, if they turn their heads as you are about to snap the photo, shutter speed won’t help but it will prevent small movements from becoming blurry.
Sometimes you want the blur. A good example would be when you are tracking a moving object across your field of view and you want to convey a feeling of movement in the image. The photo below is an image I took years ago of my friend riding by on his motorcycle.
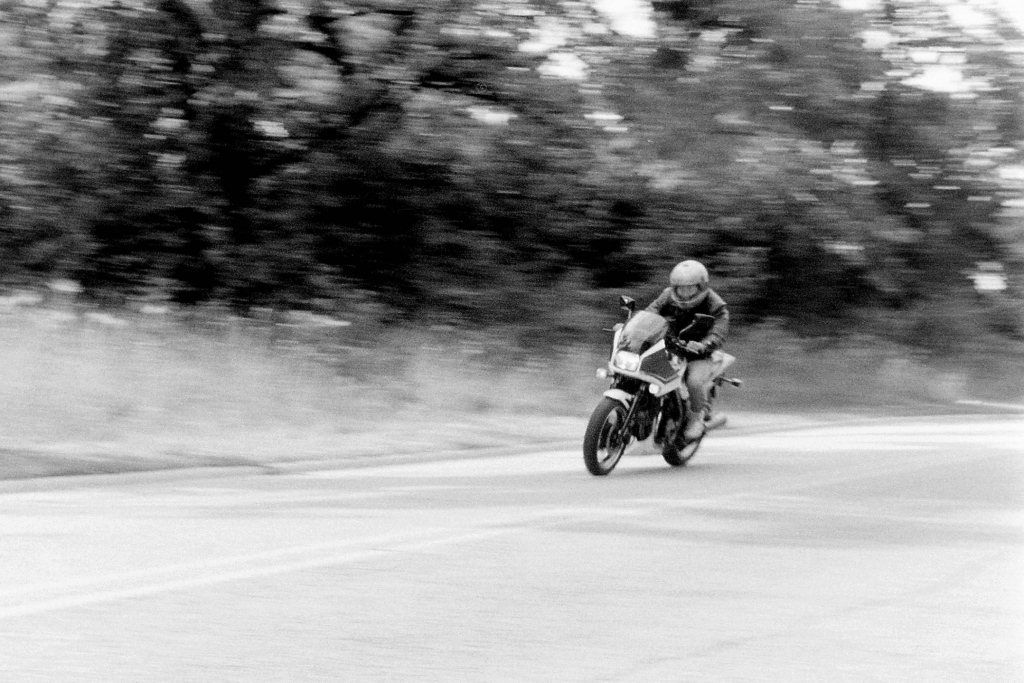
The shutter speed was just slow enough to cause blur in the background from the movement of the camera but since my camera was moving with the subject it stayed relatively sharp. This effect gives the viewer a feeling of speed.
Another reason you would want a fast shutter speed is when you are hand holding the camera. This is especially true when you are using a telephoto or zoom lens. A telephoto lens turns a small camera movement into a large one so a faster shutter speed is needed. The rule of thumb for 35 mm film cameras was that the shutter speed should equal the focal length of the lens or faster when you hand hold the camera. Now, with different size sensors and image stabilization technology, it is difficult to suggest a rule of thumb. It is probably best to check your camera’s manual for tips on this subject.
One other thing that could be useful to know is your “flash sync speed.” This probably won’t apply to anyone using your camera’s built-in flash but if you use an external flash there is a limit to how fast your shutter speed can be. Not every camera is the same so it is good to know what your camera’s sync speed is.
To understand how this works, imagine a stage where the curtain is closed but instead of the left and right curtains both being pulled to the middle, the right curtain is pulled all the way to the left. That curtain is then pulled to the right to expose the stage and when the show is over the left curtain is pulled to the right to close it. Once the audience goes home, both curtains are pulled back to the left for the next show.
A problem with flash photography occurs at higher shutter speeds. To go back to our stage analogy, when a show is very short, like 1/500th of a second (some shows I wished that was the case) the stagehand operating the left curtain starts closing his curtain 1/500th of a second after the other stagehand started pulling her curtain open. Since it takes 1/125th of a second for a curtain to travel across the stage, the entire stage is never in view at one time.
A flash is much faster. It varies but most often the flash speed will be between 1/5000th and 1/30,000th of a second. That means when the flash goes off only part of the stage will be illuminated.
ISO
ISO stands for International Organization of Standardization. This originally represented the “film speed” or its sensitivity to light. I remember it being called ASA (American Standards Association). When shooting film the photographer had to buy different types of film for different lighting conditions. On a digital camera, one can just change a setting.
The ISO number represents the sensor’s sensitivity to light. The higher the number, the less light is needed for a shot. For example, shooting at ISO 100 requires twice as much light as shooting at ISO 200. So why not just shoot everything at the highest ISO? Because every plus has a minus.
During the old days of film, high ISO film meant grainer images. Some photographer’s used that graininess to their advantage but mostly it was a necessary evil. On digital cameras, a high ISO setting results in images that have more digital “noise” that is similar to the old film grain.
Below is a photograph of Frankie shot at ISO 26,500, the maximum for my camera.

Notice the grain, or noise, when viewed close up.

Compare that to a photo of Chris at ISO 100.

See the difference? The above photo of Chris was cropped but both close-ups are at the same magnification.
Besides the major three settings, there are others that you can play around with, like white balance and HDR, but I want to stick to the basics here.
Since this post is for bloggers I want to talk about file size. Internet speeds and storage space have increased over the years but file size is still important on the web. People are busy now and will not wait more than a few seconds for your page to load so if you have a lot of photos, they should be as small as is reasonable.
There is also storage space provided by your web page hosting service to consider. If you exceed your limit you will need to pay for more storage. WordPress.com gives me 3 gigabytes of storage and so far I have used 37% in over six years of blog posts. If I uploaded my photos full size, that would have been gone long ago.
Conser this: My computer monitor’s screen resolution is (in pixels) 1680×1050. The highest I have seen is 3840×1600 which is 4K. Many are probably the same as an HDTV which is 1920×1080 and there are some older ones that are smaller than mine. Smartphones have similar resolutions but on a much smaller screen. There are 8K monitors coming out but since most blog traffic comes shortly after a post is written I wouldn’t even consider those now.
I chose long ago to use the old XGA resolution (1024 x 768) on most of my photos on this blog. Since the photo never takes up the entire screen, I thought that was a good compromise. I use the canon software that came with my camera and save a copy of the photos I will use to 1024 pixels on the longest side, a little less for square photos.

There is also a quality adjustment for jpeg files that can reduce the file size even further. My program allows a choice between one and ten with ten being the highest quality and largest file size. I choose seven because I don’t notice a quality difference at that level but I do notice slight degradations at level five.
I should note that I treat my photo blog a little different because I only use one photo per blog post and I want it to look good so I reduce it to 1200 pixels with a quality of nine.
I think that should cover the basics. If you have any questions or comments, I’d love to read them.

love it!!! sadly my beloved eos died and I have only my phone now ;O(((
Time for a new EOS.
my wallet says nooooo… time for a new wallet I think ;O)
I was supposed to get the camera on my last birthday and then for Christmas. It kept getting put off because of my wallet. 😐
that wallets should be named worrieds ;O)))
😁
Great information for photographers and those of us who post photos on our blogs even though we’ll never be “pros” with our photos. A lot goes into what I would call proper photography. You do a great job!
Pam
Thank you, Pam. I think I would have liked a career in photography.
Very well written article. Image size is something that many newbies and even some other bloggers do wrong. I’ve heard of people that filled the whole webspace within a year. Then I always point them to an article I wrote about IrfanView and image resizing.
Now I do blog on my site since 6 years or so, and I just used 72 MB of 3 GB, that’s just 2% and my site has thousands of images uploaded. It’s funny, I use 1200 px in width for my images too. It’s large enough to look at it even with my 1980×1080 screen, and small enough to never really fill the webspace. I’ve visited blogs where it took like 30 seconds to load the page even with my high speed connection, because they attached several 6000×4000 images to the post.
So, you could argue that “search engine optimization” starts already there, choosing a decent image size. It’s at least Onpage-SEO because otherwise people will leave the site when it didn’t load within less than a second. I think the Google algorythm does also rate loading speeds, it’s at least one factor, because they want to show quality sites, and a page that doesn’t load within a second is the complete opposite.
I am glad you mentioned the important point about image resizing too. There are really many bloggers that do it wrong.
Nice article!
Thanks, Dennis. That’s amazing than you used so little amount of memory. Perhaps I should get advice from you.
Looking at your screenshot and what you wrote, you’re doing it right. JPG compression at level 7 is quite commonly used by people. Anything like 6, 7 or 8 goes, just not lower. It’s still hard to tell a difference between 6, 7 and 8… and if I can’t see it, John and Jane Doe certainly won’t. But 8 is 25% bigger in file size, which is why 7 is nice compromise for blogs.
Let’s see it this way… if your images are about 200 kb big, then everything is fine because this should be possible with JPG compressed at 7 and with 1200 px width. That’s like 5 JPG files until you hit 1 MB on your webspace. Impossible to fill 3 GB WordPress.
I find my 72 MB of 3 GB unbelievable. Maybe the display is bugged. On the other side, my blog does exist since 2011, at that time I might have used even smaller resolutions at that time. Not to mention that my blog was pretty much about writing, and just turned more and more into a photography blog later. I went the route from no photos, to experimenting with a point-and-shoot camera, to using smartphone cameras and just later around 2015 to DSLR photography. Maybe I think I uploaded thousands of photos, but maybe this is a wrong impression 🙂 Would be great if there would be more stats in the media file section of the dashboard.
If your files are usually not much bigger than 200 kb, everything is fine. However, your 37% still make me wonder. Did you upload sound files or videos maybe?
I cannot figure out how to find the number of photos I have in my media library. I will say that most of my photos are between 250 and 375 kb, some less and some more. Also, I often use multiple photos In a blog post, like this one. Maybe that is why it is 37%.
Yeah I noticed that, you’re definitely not lazy like I am 🙂 Most of my posts do just have one photo. I am a lazy editor 🙂
I don’t think that makes you lazy. Every one has a different style of blogging. Perhaps I am lazy using more photos and less words.
Right. That makes it interesting to follow other bloggers. I often seen very different styles here at wordpress. I like yours 🙂
I just figured it out. I changed the view from grid to list and it said I have 2218 items.
Ah! Awesome! Now I see it too 😀 You’re a detective!
It says I have 2,586 items. So, somehow I must have trimmed them down a lot more.
I just downloaded a couple of random photos from my site. Some of mine are 50 kb (if black and white), others about 100 or 150 kb, and then some almost 200 kb. But out of five images I did not download a single one bigger than 200 kb. So, I think that might make the difference in the long run.
In the example of your 375 kb, you get about two and a half images per MB. With 200 kb you get five. So, I think that makes the difference.
Also I noticed right now.. somehow I compress them in Photoshop at quality 7, while I recently use Lightroom most of the time where I started to use quality 6 since I don’t see a real difference in quality. Maybe that’s why they get so much smaller.
But it also must be said that mine are usually not very colourful… here in the cloudy Northern Germany 😀 Could be a reason too why they are smaller.
But then again, I’ve seen people uploading files that are several MB big. So, I still think you’re absolutely fine!
I don’t have Photoshop but I used to use it at work and I think I remember It has 12 quality settings so a 7 for you is like a 6 for me. Maybe I should start using 6.
No, I checked right now. Photoshop is maximum 10. In Lightroom however they use percentages for the quality, and maximum is 100%. So, it’s probably the same.
But somehow I have something with 12 in my head too related to Photoshop.. maybe it was another file format. 😀
Maybe or maybe it was an older version. Also, photoshop might do a better job compressing photos. I don’t know.
I see it’s a complex topic… it just got into my mind that I usually try to preserve the aspect ratio while I resize down to 1200 px width. But since I crop a lot of images, it means that the height can be sometimes like 800 px, sometimes 600 px and so on, depending on how I cropped the image. Maybe I do crop a lot more than you. There can be a ton of reasons.
Great post! My human remembers ASA. She also reduces the photos for my blog quite a bit. In fact, she only makes them exactly the size she needs for the post. The downside to that is some loss of quality. The upside to that is that her images rarely get stolen because nobody wants a 500px photograph.
BTW, even with reducing the photos that much, she is still beginning to run out of storage space on her webhost’s server!
Your blog is older than mine and you post more often so I believe that.
Ha. That’s a great reason to reduce them that much.
Thanks for this. But when anyone starts talking camera stuff to the mom, her eyes start to glaze over. That’s why she only uses cameras that make it simple to take pictures.
I understand. We all have our own interests. My wife is the same way.
Excellent post. I need to see how much storage I have used in 4 years on wordpress because I didn’t realize there was a limit.
Good idea.
In High School I took a beginning Photography class and I remember many of those terms, the only problem now is I use my iPhone 🙂
I don’t have an iPhone but my Samsung Galaxy has a pro mode in the camera app that allows me to set the ISO, aperture, white balance, exposure compensation, Etc. I don’t see any shutter speed setting though.
Good in depth discussion here. Thank you!
Thank you.
Nice refreshing read.
All the basics rules us old filmies had to know but have sadly been lost in this digital world.
I really wish I could just slip a sensor and battery into my M3 or RoBoT and have all the convenience of digital but all the fun and manipulation of a quality fully manual camera.
Those were the days when you had to pay attention to all your settings because film wasn’t cheap.